
For those of you unfamiliar with how die cutting machines work, each individual letter is a cut, every red line is a cut. So, if you were to cut this name as is, there would be "bites" cut out of the overlapping letters. In order to fix this, the Studio software allows you to WELD the letters together, eliminating the overlapping parts so that you have one single flowing word.

After converting to path, then ungrouping, moving and adjusting points of the lower case letters to make a better flowing cursive script, I welded those letters together to get this:

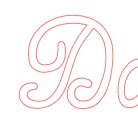
I then needed to fix the "D", which was in two parts, and not connected to the rest of the name. I manipulated the points of the "straight-line" part so that it connected the with curved part to get the image on the right:
I then welded the two pieces together to get this:

So far, so good! However, I wanted to connect the "D" to the rest of the name, so I wanted to extend the curve at the bottom of the "D" to connect to the rest of the name. When I did this, I got this:

HOWEVER!!!! The overlap place where I dragged the curl to the rest of the letters did NOT weld! I was confused... why didn't this work? As a matter of fact, after welding, the word ended up splitting into three pieces! See the picture below at the arrow--I pulled the pieces apart (see arrow) to show how the program split the word up:

Obviously, this was a problem!!! After pondering a bit and trying all sorts of other modifying techniques (and not getting ANYWHERE), I told the class I'd go home and think about a fix... and figure out why this happened in the first place.
I now understand that Studio assumes that overlapping lines from the same object (line) is creating "holes". So, when I welded, the program assumed that the overlapping part was a "hole", and therefore, broke up the assemblage into the three pieces that touched at the corners, maintaining the "hole". Okay... so that's the problem... but I still needed to fix this so it would look like a connected D! But how???
After a good night's sleep, I finally thought of a VERY simple answer: create a NEW shape that resembles the curvy connections and weld the three pieces together! I slapped my forehead because it is such a simple solution, dang it, why didn't I think of that earlier!??!!! Ugh... anyways, here's what I did:
I drew the connecting piece with the curved spline tool:
It looked like this after I adjusted the points and curves to make it look nice (the new piece I drew is in a blue line, pointed to by the arrow). Notice that the new piece overlaps both the "D" and the start of the rest of the letters:


*sigh*... mission accomplished. Finally.
I hope this helps you with your Silhouette welding issues...
That's ALL, Folks!
-Dayle
No comments:
Post a Comment